自定义登陆页面
大约 2 分钟
注意
本篇博客是用来配置前后不分离的项目,正常情况下现在的项目都是前后分离了,因此本篇内容 并没有太多学习价值,但是网上大多数教程都特别喜欢讲这一部分内容,就我目前了解到的内容, 在搭建oauth2授权服务器可能会用到,因为授权服务器需要一个登录页面,这个页面可以单独放到后端,仅仅做个登录没有必要开一个前端项目.
1、修改自定义的登陆页面以及登陆请求校验
官方文档
https://docs.spring.io/spring-security/reference/servlet/authentication/passwords/form.html
1.1 Secutity配置
在Security配置文件配置loginPage指定登陆的页面,loginProcessingUrl指定用户名密码认证处理地址,同时一定要放行这两个页面,否则会一直被拦截导致重定向到登陆页面。 另外,还要准备自定义页面,以及自定义处理接口。
注意
一般情况,无需自定义登陆处理逻辑,只需要修改登陆页面,在登陆页面把action保留原来的login即可
protected void configure(HttpSecurity http) {
    http.formLogin().loginPage("/token/login").loginProcessingUrl("/token/custom")
            .successHandler(tenantSavedRequestAwareAuthenticationSuccessHandler())
            .failureHandler(authenticationFailureHandler()).and().logout()
            .logoutSuccessHandler(logoutSuccessHandler()).deleteCookies("JSESSIONID").invalidateHttpSession(true)
            .and().authorizeRequests().antMatchers("/token/**", "/actuator/**", "/mobile/**").permitAll()
            .anyRequest().authenticated().and().csrf().disable();
}
@Controller
@RequestMapping("token")
public class PageController {

    @GetMapping("/login")
    public String login(){
        System.out.println();
        return "login";
    }

    @PostMapping("/custom")
    public void ok(HttpServletResponse response ,@RequestParam("username")String username ,@RequestParam("password")String password){
        //自定义校验逻辑
        //...
        //处理完后重定向到之前的请求路径
        response.sendRedirect("https://www.baidu.com");
    }
}
1.2 自定义登陆页面
<body class="sign_body">
<div class="container form-margin-top">
    <form class="form-signin" action="/token/custom" method="post">
        <h2 class="form-signin-heading" align="center">统一认证系统</h2>

        <#if tenantList??>
            <select class="form-control form-margin-top" placeholder="所属租户" name="TENANT-ID">
                <#list tenantList as tenant>
                    <option value="${tenant.id}">${tenant.name}</option>
                </#list>
            </select>
        </#if>

        <input type="hidden" name="clientId" class="form-control" value="pig" placeholder="所属客户端" >
        <input type="text" name="username" class="form-control" placeholder="账号" required autofocus>
        <input type="password" name="password" class="form-control" placeholder="密码" required>
        <button class="btn btn-lg btn-primary btn-block" type="submit">sign in</button>
        <#if error??>
            <span style="color: red; ">${error?html}</span>
        </#if>
    </form>
</div>
2、开启表单认证
- 如下图,开启表单登录可以Security开启了14个过滤器(忽略TokenAuthenticationFilter这个是我自定义的)

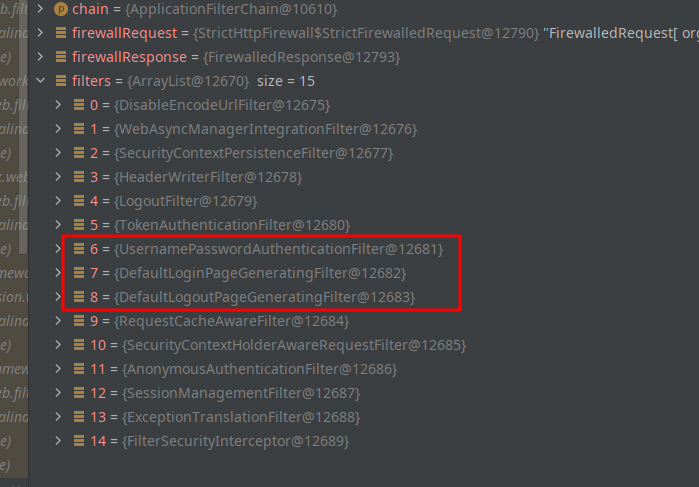
- 开启表单登录后,当访问一个未认证的接口时,会被重定向到登录页,因为开启表单认证后,默认的AuthenticationEntryPoint实现是LoginUrlAuthenticationEntryPoint,

3、关闭表单认证
除了我自定义的TokenAuthenticationFilter过滤器外还有11个,与上面相比刚好少了3个和表单相关的过滤器(UsernamePassworkAuthenticationFilter,DefaultLoginPageGeneratingFilter,DefaultLogoutPageGeneratingFilter) 
并且关闭表单验证后,默认的AuthenticationEntryPoint变成了Http403ForbiddenEntryPoint,当用户未认证时,去访问一个接口就会被此类处理,返回403异常,不会跳转到登录表单。