Security扩展自定义登录方式
大约 4 分钟
1、需求
前后分离项目使用不同登录方式进行登录
    1. 使用帐号/密码登录
    2. 使用手机号/验证码登录
2、实现方法
注
Security是一个扩展性很强的框架,预留了各种端点进行扩展,多种方式登录需要扩展AuthenticationProvider,进行自定义实现。默认情况 Security使用的是DAOAuthenticationProvider,就是从数据库中读取用户名/密码进行校验。
2.1 自定义AuthenticationProvider
思考
自定义了AuthenticationProvider后为什么连AuthenticationToken也要自定义?
为什么不直接用UsernamePasswordAuthenticationToken?
//自定义AuthenticationProvider
@Component
@Slf4j
public class CustomMobileAuthenticationProvider implements AuthenticationProvider {

    @Autowired
    private UserDetailsService userDetailsService;

    @Override
    public Authentication authenticate(Authentication authentication) throws AuthenticationException {
        log.info("enter into custom AuthenticationProvider");
        //
        CustomSecurityUser customSecurityUser = (CustomSecurityUser) userDetailsService.loadUserByUsername(authentication.getPrincipal().toString());
        PhoneAuthenticationToken phoneAuthenticationToken = new PhoneAuthenticationToken(customSecurityUser,null);
        return phoneAuthenticationToken;
    }

    @Override
    public boolean supports(Class<?> authentication) {
        return PhoneAuthenticationToken.class.isAssignableFrom(authentication);
    }
}
2.2 自定义AuthenticationToken
//自定义AuthenticationToken
public class PhoneAuthenticationToken extends AbstractAuthenticationToken {

    private static final long serialVersionUID = SpringSecurityCoreVersion.SERIAL_VERSION_UID;

    private final Object principal;

    private Object credentials;

    /**
     * This constructor can be safely used by any code that wishes to create a
     * <code>UsernamePasswordAuthenticationToken</code>, as the {@link #isAuthenticated()}
     * will return <code>false</code>.
     *
     */
    public PhoneAuthenticationToken(Object principal, Object credentials) {
        super(null);
        this.principal = principal;
        this.credentials = credentials;
        setAuthenticated(false);
    }

    /**
     * This constructor should only be used by <code>AuthenticationManager</code> or
     * <code>AuthenticationProvider</code> implementations that are satisfied with
     * producing a trusted (i.e. {@link #isAuthenticated()} = <code>true</code>)
     * authentication token.
     * @param principal
     * @param credentials
     * @param authorities
     */
    public PhoneAuthenticationToken(Object principal, Object credentials,
                                               Collection<? extends GrantedAuthority> authorities) {
        super(authorities);
        this.principal = principal;
        this.credentials = credentials;
        super.setAuthenticated(true); // must use super, as we override
    }

    /**
     * This factory method can be safely used by any code that wishes to create a
     * unauthenticated <code>UsernamePasswordAuthenticationToken</code>.
     * @param principal
     * @param credentials
     * @return UsernamePasswordAuthenticationToken with false isAuthenticated() result
     *
     * @since 5.7
     */
    public static UsernamePasswordAuthenticationToken unauthenticated(Object principal, Object credentials) {
        return new UsernamePasswordAuthenticationToken(principal, credentials);
    }

    /**
     * This factory method can be safely used by any code that wishes to create a
     * authenticated <code>UsernamePasswordAuthenticationToken</code>.
     * @param principal
     * @param credentials
     * @return UsernamePasswordAuthenticationToken with true isAuthenticated() result
     *
     * @since 5.7
     */
    public static UsernamePasswordAuthenticationToken authenticated(Object principal, Object credentials,
                                                                    Collection<? extends GrantedAuthority> authorities) {
        return new UsernamePasswordAuthenticationToken(principal, credentials, authorities);
    }

    @Override
    public Object getCredentials() {
        return this.credentials;
    }

    @Override
    public Object getPrincipal() {
        return this.principal;
    }

    @Override
    public void setAuthenticated(boolean isAuthenticated) throws IllegalArgumentException {
        Assert.isTrue(!isAuthenticated,
                "Cannot set this token to trusted - use constructor which takes a GrantedAuthority list instead");
        super.setAuthenticated(false);
    }

    @Override
    public void eraseCredentials() {
        super.eraseCredentials();
        this.credentials = null;
    }

}
回答上面的问题,AuthenticationProvider接口中中有个boolean supports(Class<?> authentication);方法,
此方法表明该AuthenticationProvider的处理范围,我们知道AuthenticationManager的实现类一般用的是ProviderManager,
在此类中管理了很多AuthenticationProvider负责真正的认证工作,那么当有多个AuthenticationProvider的时候,它们
是如何确定某个AuthenticationProvider是否需要对此次登录进行认证呢?玄机就在上面的support方法,一般情况下它的实现如下
@Override
public boolean supports(Class<?> authentication) {
//authentication是PhoneAuthenticationToken或其子类
return PhoneAuthenticationToken.class.isAssignableFrom(authentication);
}
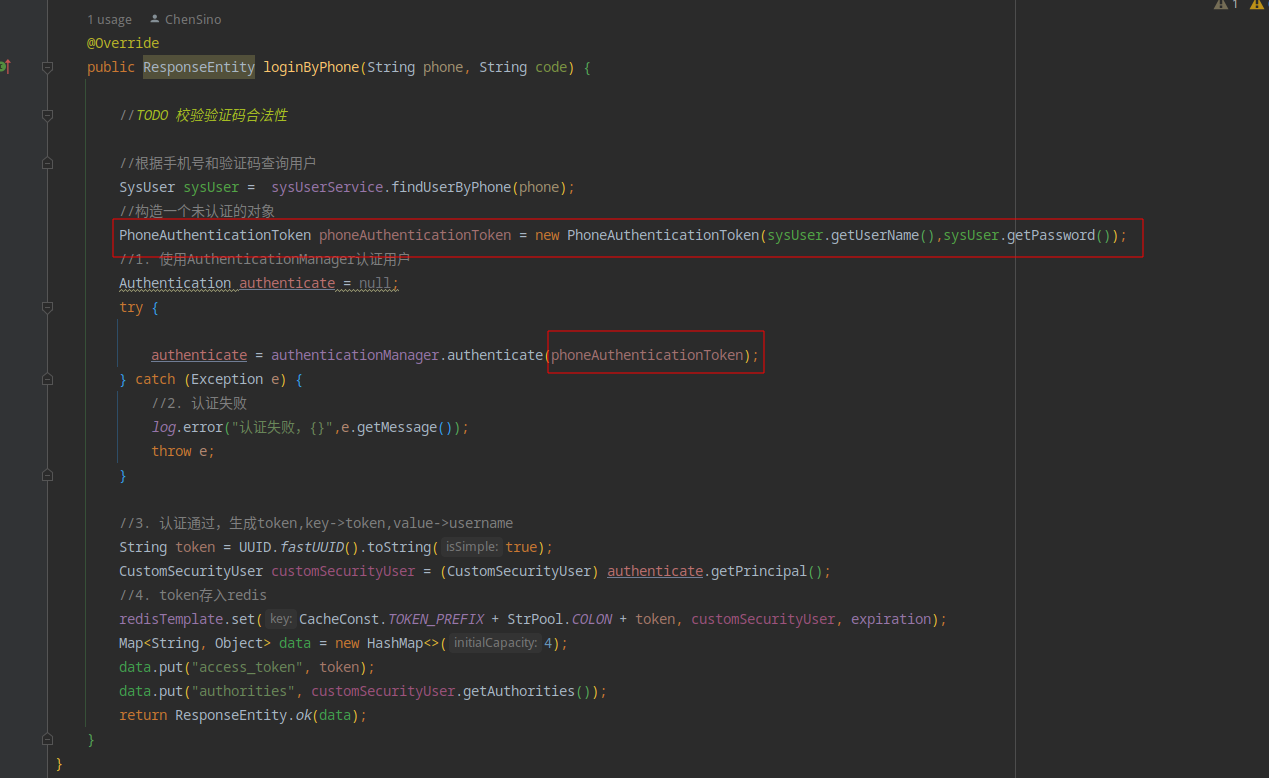
上面参数authentication,是在认证时传递过来的,在Service层授权是传递的如下图所示,当认证时传递的PhoneAuthenticationToken类型,
则此类型经过supports方法判断时该Provider是否要处理此时认证,当然上面的只是一般写法,可以根据业务需求写一些复杂的判断。
2.3 自定义登录接口
//Controller层
    @PostMapping("phone")
    public ResponseEntity login(String phone,String code){
        return loginService.loginByPhone(phone,code);
    }

//Service层
    @Override
    public ResponseEntity loginByPhone(String phone, String code) {

        //TODO 校验验证码合法性

        //根据手机号和验证码查询用户,手机号——>用户
        SysUser sysUser =  sysUserService.findUserByPhone(phone);
        //构造一个未认证的对象
        PhoneAuthenticationToken phoneAuthenticationToken = new PhoneAuthenticationToken(sysUser.getUserName(),sysUser.getPassword());
        //1. 使用AuthenticationManager认证用户
        Authentication authenticate = null;
        try {

            authenticate = authenticationManager.authenticate(phoneAuthenticationToken);
        } catch (Exception e) {
            //2. 认证失败
            log.error("认证失败,{}",e.getMessage());
            throw e;
        }

        //3. 认证通过,生成token,key->token,value->username
        String token = UUID.fastUUID().toString(true);
        CustomSecurityUser customSecurityUser = (CustomSecurityUser) authenticate.getPrincipal();
        //4. token存入redis
        redisTemplate.set(CacheConst.TOKEN_PREFIX + StrPool.COLON + token, customSecurityUser, expiration);
        Map<String, Object> data = new HashMap<>(4);
        data.put("access_token", token);
        data.put("authorities", customSecurityUser.getAuthorities());
        return ResponseEntity.ok(data);
    }
2.4 配置自定义的AuthenticationProvider
注意要记得保留默认的登录方法,当设置了自定义AuthenticationProvider时,Security不会自动注入原来默认
的DAOAuthenticationProvider了,如果想保留的话,需要我们手动注入,
    /**
     * 新版本security获取AuthenticationManager的两种方法
     * @param authenticationConfiguration
     * @return
     * @throws Exception
     */
//    @Bean
//    public AuthenticationManager authenticationManager(AuthenticationConfiguration authenticationConfiguration) throws Exception {
//        return authenticationConfiguration.getAuthenticationManager();
//    }


    @Bean
    public AuthenticationManager authManager(HttpSecurity http) throws Exception {
        AuthenticationManagerBuilder authenticationManagerBuilder =
                http.getSharedObject(AuthenticationManagerBuilder.class);
        authenticationManagerBuilder.authenticationProvider(customMobileAuthenticationProvider);//自定义的
        authenticationManagerBuilder.authenticationProvider(authProvider());//原来默认的

        return authenticationManagerBuilder.build();
    }


    /**
     * 默认AuthenticationProvider,如果创建了自定义AuthenticationProvider,则默认的就不会被注入到AuthenticationManager,
     * 所以如果还想保留默认的,需要手动创建bean,并在AuthenticationManager中注入
     * @return
     */
    @Bean
    public DaoAuthenticationProvider authProvider() {
        DaoAuthenticationProvider authenticationProvider = new DaoAuthenticationProvider();
        authenticationProvider.setPasswordEncoder(passwordEncoder());
        authenticationProvider.setUserDetailsService(userDetailsService);
        return authenticationProvider;
    }