oauth第三方登录
注
本博客介绍前后端分离项目的完整接入oauth的流程,本博客使用github来示范,因为github注册oauth应用无须审核,微信审核特别麻烦,并且个人用户无法注册
1 oauth2
1.1 典型应用场景
    1. 社交帐号登录应用,比如使用微信、微博登录其它应用
    2. 从第三方获取用户资料比如:手机号、邮箱、头像等
    3. 从第三方获取业务数据,比如:通过自己的系统想从京东获取订单
1.2 完整时序图
假设有一个软件叫开立权限管理系统,该系统接入了github登录,则使用github登录的完整的oauth流程如下:
sequenceDiagram
    actor E as 资源所有者(github用户)
    participant A as 开立权系统前端(浏览器)
    participant B as 开立管理系统后端
    participant C as 微信Oauth服务器
    participant D as github受保护资源
    E ->> A: 1.访问开立系统
    A->>A: 引导授权,用户选择github登录
    A->>C: 2. 第一次重定向到授权服务
    C->>C: 校验当前客户端合法性,重定向到github登录页
    E->>C: 3. 输入帐号密码登录
    C->>C: 4 生成授权码code
    C-->>A: 5. 第二次生定向,跳转到开立系统前端,并且携带了code
    A->>B: 6.请求最终会携带code到后端
    B->>B: 获得code
    B->>C: 7. 拿到code,post请求oauth服务器
    C--)B: 8. 返回access_token
    B->>D: 9. 携带access_token,访问受保护资源
    D--)B: 10. 返回用户信息
2 GitHub配置
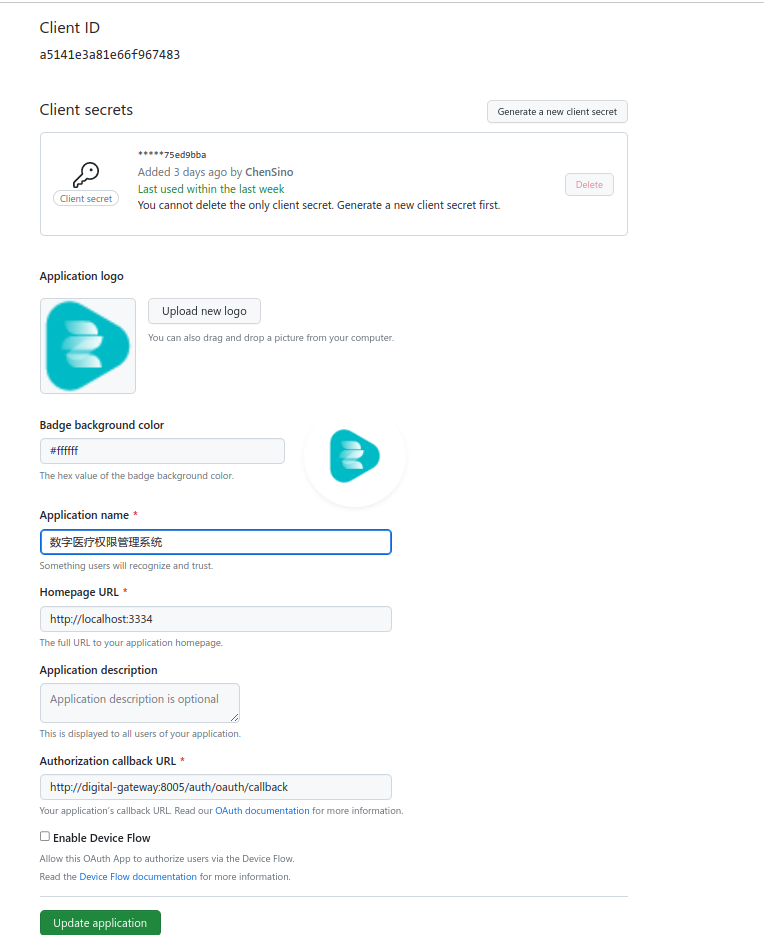
进入个人设置,开发者设置,注册一个Oauth应用,注意回调地址一定要和后端代码中实际使用的是同一个,在这个界面注册后会产生clientId和secret,在回调的时候需要用到。
3 前后分离项目前后端交互
4 前端代码
与普通项目相比,对接oauth项目前端需要使用技术如下:
- window.open弹小窗
- window.addEventListener监听后端回传的数据
前端使用一个小弹窗来登录github,同时该弹窗还要监听后端发送过来的message进行解码,交互是通过window.opener.postMessageapi实现的,后端的响应的页面中要使用该api进行传值,主要传递token,用户信息等。
// proxy 配置
'/api': {
target: 'http://digital-gateway:8005',
changeOrigin: true,
rewrite: path => path.replace(/^\/api/, ''),
ws: false,
},
//业务代码
<span title="github登录" class="iconfont" @click="githubLogin"
></span >
//github登录
const githubLogin = () => {
//window.open会自动拼接当前的域,然后走vue proxy转发到后端
const githubLoginUrl = '/api/auth/oauth/githubLogin'
// 弹出 500 * 500 的窗口
window.open(
githubLoginUrl,
'new',
'height=500, width=500, top=0, left=0, toolbar=no, menubar=no, scrollbars=no, resizable=no,location=n o, status=no',
)
// 通过监听,父页面可以拿到子页面传递的token,父(前端页面),子(后端freemarker小窗)
window.addEventListener(
'message',
e => {
try {
//后端传递的Base64格式数据【解决多html通信,引号的编码问题】,此处解码
const decodedString = new TextDecoder().decode(
new Uint8Array(
atob(e.data)
.split('')
.map(c => c.charCodeAt(0)),
),
)
//登录后的用户信息
const loginRes: LoginRes = JSON.parse(decodedString)
if (loginRes.token) {
//前端保存token
setToken(loginRes.token)
//其它
changeUserInfo(loginRes.user)
//跳转到首页
router.push('/home')
} else {
ElMessage.error('使用GitHub登录失败')
}
} catch (e) {
console.log('OAuth登录失败,', e)
}
},
false,
)
}
5 后端处理
5.1 处理github授权请求
这个接口可以不用写在后端,前端可以直接请求
https://github.com/login/oauth/authorize?client_id=xxx&redirect_uri=xxx,正常情况下,前端请求后会根据redirect_url重定向到我们配置的后端接口,这个redirect_url一定要和你在github配置的一致,我这里把请求github的授权用后端转发了一下,所以最后要重定向一下,还是重定向到了https://github.com/login/oauth/authorize?client_id=xxx&redirect_uri=xxx
    @GetMapping("oauth/githubLogin")
    public void githubLogin(HttpServletResponse response) throws IOException {
        StringBuilder url = new StringBuilder();
        url.append(githubConfig.getAuthorizeUrl())
                .append("?client_id=")
                .append(githubConfig.getClientId())
                .append("&redirect_uri=")
                .append(githubConfig.getRedirectUri());
        //重定向到github开放的登录页面
        response.sendRedirect(url.toString());
    }
5.2 重定向后的处理
注意!!!
这里要注意,重定向后返回的是一个ModelAndView视图,所以注解要用@Controller,切记不要用@RestController
@RequiredArgsConstructor
@Controller
@RequestMapping(value = "/")
@Api(value = "/", tags = "第三方登录接口")
public class OauthLoginController {

    private final IOauthLoginService oauthLoginService;

    @GetMapping("oauth/githubLogin")
    public void githubLogin(HttpServletResponse response) throws IOException {
        oauthLoginService.redirect(response);
    }

    //github重定向后会进入这里,并且会携带一个code
    @RequestMapping("/oauth/callback")
    public ModelAndView gitHubCallback(@RequestParam String code) throws UnsupportedEncodingException {
        return oauthLoginService.loginByGitHub(code);
    }

}
@Override
public ModelAndView loginByGitHub(String code) throws UnsupportedEncodingException {
//视图,对应我的模板文件,有个github.ftl
ModelAndView mv = new ModelAndView("github");
//github 的oauth必要的参数,code是重定向时带过来的
Map<String, Object> params = new HashMap<>(4);
params.put("code", code);
params.put("client_id", githubConfig.getClientId());
params.put("client_secret", githubConfig.getSecret());
//根据code请求github的token
String response = HttpUtil.post(githubConfig.getAccessTokenUrl(), params);
//解析出token
String token = response.split("&")[0].split("=")[1];
// 拿到github token,根据token请求用户信息
String githubUser = HttpRequest.get(githubConfig.getUserInfoUrl()).header("Authorization", "Bearer " + token).execute().body();
//根据github响应用户信息查询对应的本地用户
String githubUserId = JSONObject.parse(githubUser).get("id").toString();
//拿到github的ueserId,根据userId到自己的系统查询当前登录的github对应的自己系统用户,
//TODO 以下查询逻辑要改成自己的
SubUser subUser = new SubUser();
subUser.setSubUserId(githubUserId);
subUser.setProjectCode("github");
List<SubUser> subUserList = subUserService.selectBySubUser(subUser);
if (CollectionUtil.isEmpty(subUserList)) {
throw new BusinessException("当前登录的GitHub帐号未和系统帐号绑定,请先绑定再使用GitHub进行登录");
}
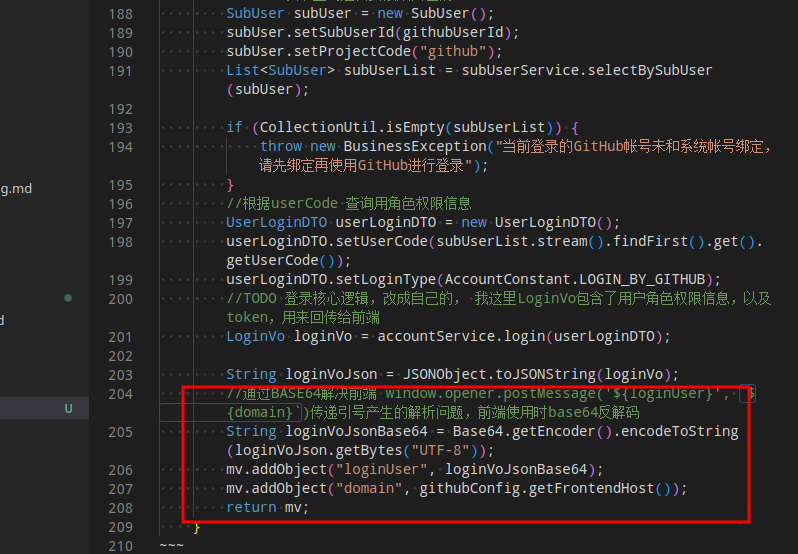
//根据userCode 查询用角色权限信息
UserLoginDTO userLoginDTO = new UserLoginDTO();
userLoginDTO.setUserCode(subUserList.stream().findFirst().get().getUserCode());
userLoginDTO.setLoginType(AccountConstant.LOGIN_BY_GITHUB);
//TODO 登录核心逻辑,改成自己的, 我这里LoginVo包含了用户角色权限信息,以及token,用来回传给前端
LoginVo loginVo = accountService.login(userLoginDTO);
String loginVoJson = JSONObject.toJSONString(loginVo);
//通过BASE64解决前端 window.opener.postMessage('${loginUser}', `${domain}`)传递引号产生的解析问题,前端使用时base64反解码
String loginVoJsonBase64 = Base64.getEncoder().encodeToString(loginVoJson.getBytes("UTF-8"));
mv.addObject("loginUser", loginVoJsonBase64);
mv.addObject("domain", githubConfig.getFrontendHost());
return mv;
}
重定向后响应的视图github.ftl如下,这里代码非常简单,就是打开一下,然后调用前端的window.opener.postMessageapi,把登录后的数据发送给前端,window.opener是指的调用当前页面的“页面”,其实就是用户打开的系统首页,这是回传消息也是回传给首页那个页面,回传后前端通过window.addEventListener('message',e=>{})可以监听到发送来的数据。
<!doctype html>
<html lang="en">
<head>
    <meta charset="UTF-8">
    <meta name="viewport"
          content="width=device-width, user-scalable=no, initial-scale=1.0, maximum-scale=1.0, minimum-scale=1.0">
    <meta http-equiv="X-UA-Compatible" content="ie=edge">
    <title>GitHub登录</title>
</head>
<body>
登陆中...
<script>
    window.onload = function () {
        //给指定domain发送消息
        window.opener.postMessage('${loginUser}', `${domain}`)
        //数据发送后自动关闭
        window.close();
    }
</script>
</body>
</html>
5.3 前后交互数据问题
这里前后交互数据其实是通过一个中转页面github.ftl实现的,这里中转时遇到了数据格式问题,后端通过freemarker模板回应的数据,被前端监听后解析总有双引号问题,所以这通过base64中转一下,后端base64编码,前端base64解码。